| Sprint 5 Tech Talk Notes | SQLAlchemy Code | SQLConnect Code | API Tech Talk 2 Notes | Sprint 5 CRUD Review | Big Idea 4 Learnings | Final Exam Blog | 2020 MC Review | Personalized Project Repository |
Big Idea 4 Learnings
Internet Protocols and Deployment Learning
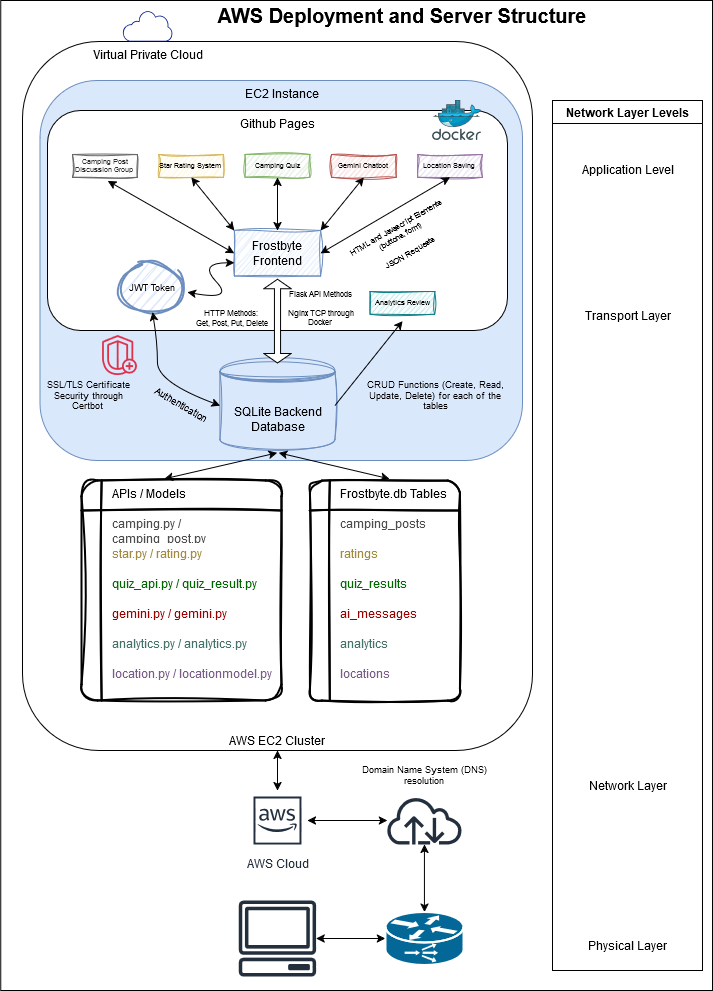
Deployment Diagram for our AWS Server
We created a camping and national park review site.
Our project integrates a Flask-based backend (running on port 8887) and a JavaScript frontend (running on port 4887) to provide seamless communication via RESTful APIs. Here’s a summary of the key features and setup:
Key Features
- Review API: Handles CRUD operations for user reviews with authentication using JWT tokens.
- Gemini API: Integrates Google Generative AI for camping advice, storing chatbot conversations in the database.
- Quiz API: Manages quiz results, assigning national parks based on user responses and supporting CRUD operations.
- Location API: Tracks and manages user-specific location data linked to channels with secure token-based authentication.
- Analytics API: Processes and retrieves data on star ratings and review counts for reporting.
- Post API: Enables CRUD operations for posts, associating them with users and channels.
Setup Details
- Frontend-Backend Communication: The frontend fetches data from the backend through HTTP requests, with the backend handling data processing and database interactions.
- Subdomain and CORS: Cross-Origin Resource Sharing (CORS) is configured in Flask to allow the frontend (port 4887) to securely communicate with the backend (port 8887) during development.
This structure ensures smooth integration, secure interactions, and efficient handling of user data across both frontend and backend.
College Board Requirements Met:
- Use of HTTP and RESTful APIs: I created the star API that interacts with the backend using GET, POST, PUT, and DELETE functions (see below). This ties into our national park page through the overall star review section.
- Performance Optimization: I use caching by storing the stars in the cache until the “Submit” button is selected, as well as indexing the database for previous records, thus meeting Performance Optimization requirements.
- Monitoring and Logging: Logging occurs through the console log, with error statements being printed for debugging
- Security and Authentication: Each action in my API requires the authentication token, which fetches the JWT token from the cache for each browser session
Snippet of Code for College Board Requirements:
class _RATING(Resource):
        @token_required()
        def post(self):
            """Handle both storing and fetching ratings."""
            current_user = g.current_user
            data = request.get_json()

            # If 'stars' is in the request body, handle storing a rating
            if 'stars' in data:
                # Validate required fields
                if not data or 'stars' not in data or 'channel_id' not in data:
                    return {'message': 'Missing required fields (stars, channel_id)'}, 400

                stars = data['stars']
                channel_id = data['channel_id']

                # Validate stars
                if not isinstance(stars, int) or stars < 1 or stars > 5:
                    return {'message': 'Invalid star rating. Must be an integer between 1 and 5.'}, 400

                # Check if the channel exists
                channel = Channel.query.get(channel_id)
                if not channel:
                    return {'message': 'Channel not found'}, 404

                # Create or update the rating
                rating = Rating.query.filter_by(user_id=current_user.id, channel_id=channel.id).first()
                if rating:
                    rating.stars = stars  # Update the stars if the rating already exists
                else:
                    rating = Rating(stars=stars, user_id=current_user.id, channel_id=channel.id)
                    db.session.add(rating)

                db.session.commit()
                return {'message': 'Rating submitted successfully', 'rating': rating.read()}, 201

            # If 'stars' is NOT in the request body, assume it's a fetch request
            elif 'user_id' in data and 'channel_id' in data:
                user_id = data.get('user_id')
                channel_id = data.get('channel_id')

                # Validate request data
                if not user_id or not channel_id:
                    return {'message': 'Missing user_id or channel_id in request body'}, 400

                # If user_id is a string (e.g., a name like "toby"), map it to its ID
                if isinstance(user_id, str):  # If user_id is passed as a name
                    print(f"Searching for user with name: {user_id}")
                    user = Frostbyte.query.filter_by(_uid=user_id).first()
                    if not user:
                        print(f"User '{user_id}' not found in the database.")
                        return {'message': f'User "{user_id}" not found'}, 404
                    user_id = user.id
                    print(f"Found user: {user.name} with ID: {user.id}")

                # Query the Rating table for the user's rating for the given channel
                rating = Rating.query.filter_by(user_id=user_id, channel_id=channel_id).first()

                if not rating:
                    return {'message': 'No rating found for the specified user and channel'}, 404

                return jsonify({'stars': rating.stars})

            # If neither case matches, return an error
            return {'message': 'Invalid request'}, 400

        @token_required()
        def put(self):
            """
            Update a post.
            """
            # Obtain the current user
            current_user = g.current_user
            # Obtain the request data
            data = request.get_json()
            # Find the current post from the database table(s)
            post = Frostbyte.query.get(data['id'])
            if post is None:
                return {'message': 'Post not found'}, 404
            # Update the post
            post._title = data['title']
            post._content = data['rating']
            post._channel_id = data['channel_id']
            # Save the post
            post.update()
            # Return response
            return jsonify(post.read())

        @token_required()
        def get(self):
            """Retrieve all ratings for a post."""
            data = request.get_json()

            if not data or 'channel_id' not in data:
                return {'message': 'Channel ID is required'}, 400

            ratings = Rating.query.filter_by(channel_id=data['channel_id']).all()
            if not ratings:
                return {'message': 'No ratings found for this channel'}, 404

            return jsonify({
                "ratings": [rating.read() for rating in ratings]
            })

        @token_required()
        def delete(self):
            """Delete all ratings by a specific user."""
            data = request.get_json()
            user_id = data.get('user_id')

            # Validate user_id
            if not user_id:
                return {'message': 'Missing user_id in request body'}, 400 ############### Example of Logging in the console ###############

            # Query the User table to ensure the user exists
            user = Frostbyte.query.filter_by(_uid=user_id).first()  # Match by _uid
            if not user:
                return {'message': f'User "{user_id}" not found'}, 404

            # Delete all ratings by the user
            deleted_count = Rating.query.filter_by(user_id=user.id).delete()
            db.session.commit()

            if deleted_count == 0:
                return {'message': 'No ratings found for the specified user'}, 404

            return {'message': f'Deleted {deleted_count} rating(s) for user "{user_id}"'}, 200
Ideal final project
-> Host both the Flask backend and frontend on an AWS EC2 instance, ensuring communication between the two. The deployment should support:
Scalability: Handling Multiple Users Efficiently
- Using multiple workers in gunicorn helps process several requests at the same time, preventing slowdowns.
- Running background tasks with Celery and Redis keeps the main app responsive by handling time-consuming jobs separately.
- Scaling the backend horizontally (adding more instances) using Docker or Kubernetes helps handle more users without overloading a single server.
- Optimizing database performance with connection pooling and caching makes sure queries run quickly, even with many users.
Security: Protecting Data and Access
- Setting up firewall rules blocks unwanted traffic and restricts access to only necessary services.
- Enabling SSL/TLS encryption ensures data sent between users and the server is secure.
- Using JWT tokens, API keys, or OAuth controls who can access different parts of the app.
- Running the app in a secure Docker container with limited permissions reduces security risks.
Reliability: Keeping the Backend Running Smoothly
- Automated deployment with tools like GitHub Actions ensures updates happen without breaking the app.
- Setting up logging and monitoring with tools like Prometheus or Logstash helps track errors and performance issues in real time.
- Using backup strategies and automatic rollbacks prevents downtime in case of failures.
Domain Integration: Routing Traffic Properly
- Setting up a subdomain (http://frostbyte.stu.nighthawkcodingsociety.com) keeps it organized.
- Using a reverse proxy (like Nginx) can help direct traffic efficiently while improving security.
- Configuring DNS settings correctly ensures that users can reach the backend without connection issues.
Networking Stack in Github Pages:
As outlined in our diagram above, our project utilizes all four networking layers to offer a cohesive experience to the user.
1. Application Layer: HTTP/DNS in Action
Frontend (GitHub Pages)
The frontend, built with modern JavaScript, uses the Fetch API to make HTTP(S) requests to the backend. These requests perform key operations like creating and updating reviews or fetching quiz results.
- A domain name resolves to the backend’s IP address using DNS (frostbyte.stu.nighthawkcodingsociety.com)
- The browser sends HTTP requests, specifying methods (e.g., GET, POST, PUT, DELETE), headers, and optional JSON payloads for CRUD operations.
- For example, if a user submits a review, the frontend sends a POST request to /api/review with the review data in JSON format.
Backend (AWS EC2 with Docker)
The backend processes these requests using Flask and interacts with the SQLite database to handle:
- Create: Adding new records like user reviews or quiz results.
- Read: Retrieving stored data, such as user reviews or analytics.
- Update: Modifying existing data entries.
- Delete: Removing records from the database.
Flask sends HTTP responses with status codes, headers, and JSON data back to the frontend for display.
Security Matters
Certbot manages SSL/TLS certificates, ensuring all communication between the frontend and backend is encrypted via HTTPS.
2. Transport Layer: TCP/UDP for Reliable Communication
HTTP(S) requests are transmitted over TCP, ensuring reliable delivery of data. Here’s the flow:
- Request: Nginx routes incoming TCP traffic to the correct Docker container based on the URL path. A three-way TCP handshake establishes a secure connection.
- Response: The backend sends responses over the same TCP connection, guaranteeing that data arrives intact and in order.
3. Network Layer: Routing the Packets
At this layer, TCP segments carrying HTTP requests are encapsulated into IP packets. These packets are:
- Sent: Routed across the internet to the AWS EC2 instance.
- Received: AWS handles routing and load balancing before the backend processes the request.
The backend sends the response back to the client in the same way.
4. Physical Layer: The Hardware
Data ultimately travels through physical infrastructure—cables, routers, and wireless access points—before reaching the client. Whether the user is on Wi-Fi, Ethernet, or mobile data, the process remains seamless.
Our Tools: The Backbone of Development
- Docker: Ensures consistent backend deployment across development, testing, and production.
- Nginx: Routes incoming traffic and manages connections between the frontend and backend.
- Certbot: Secures communication with SSL/TLS certificates.
- SQLite: Stores data for CRUD operations, from reviews to analytics.
- JavaScript Fetch API: Powers asynchronous HTTP requests from the frontend.
- Flask: Provides RESTful APIs for handling requests and interacting with the database.
College Board Requirement Met:
- Deployment Strategies: We will be using AWS for our deployment and continuous deployment pipelines will automate the process
- Domain Name System: Our configured EC2 instance will be mapped to the frostbyte.stu.nighthawkcodingsociety.com domain through DNS resolution, as outlined in the diagram above
Deployment Process
Deployment Process Using Docker & Cockpit for a GitHub Pages Frontend & Backend Site
Prepare the Backend (Flask + Docker)
- Create a Dockerfile in the backend directory to containerize the Flask app.
- Ensure gunicorn is set up to serve the app on a specified port (e.g., 8087).
-
Build and test the Docker image locally:
docker build -t my-backend . docker run -p 8087:8087 my-backend - Push the image to a container registry (e.g., Docker Hub or GitHub Container Registry).
Deploy the Backend with Cockpit
- Access Cockpit on the server (Cockpit is a web-based Linux server manager).
- Use Docker inside Cockpit to pull and run the backend container.
- Set up the container to restart automatically and expose the correct port.
- Use Nginx as a reverse proxy to route traffic properly to the backend.
Set Up the Frontend on GitHub Pages
- Ensure the frontend (static files) is inside the docs/ folder or a separate repo.
- Configure the repository’s GitHub Pages settings to serve from docs/ or the main branch.
- Update frontend API requests to use the correct backend URL (http://frostbyte.stu.nighthawkcodingsociety.com)
Domain & Traffic Management
- Set up DNS records to point your custom domain and subdomain to GitHub Pages (frontend) and Cockpit (backend).
- Configure HTTPS (SSL/TLS) for both frontend and backend using GitHub’s built-in SSL for Pages and Let’s Encrypt for the backend.
Monitoring & Updates
- Use Cockpit’s logs and performance metrics to monitor the backend.
- Automate deployment with GitHub Actions to update the backend when pushing new changes.
This setup ensures a smooth deployment process, with GitHub Pages serving the frontend and Docker + Cockpit managing the backend efficiently.
Frontend and Backend Setup: Port 8102
We have set the following configuration in config.yml in frontend:
```yml
Server: https://frostbyte.stu.nighthawkcodingsociety.com
Domain: stu.nighthawkcodingsociety.com
Subdomain: frostbyte
```
In assets/api/config.js, we set:
  export var pythonURI;
  if (location.hostname === "localhost" || location.hostname === "127.0.0.1") {
      pythonURI = "http://localhost:8102";  // Same URI for localhost or 127.0.0.1
  } else {
      pythonURI = "https://frostbyte.stu.nighthawkcodingsociety.com";
  }
In the backend, we set these configurations:
-
main.py
if __name__ == "__main__": # change name for testing app.run(debug=True, host="0.0.0.0", port="8102") -
Dockerfile
<code> FROM docker.io/python:3.11 WORKDIR / RUN apt-get update && apt-get upgrade -y && \ apt-get install -y python3 python3-pip git COPY . / RUN pip install --no-cache-dir -r requirements.txt RUN pip install gunicorn ENV GUNICORN_CMD_ARGS="--workers=1 --bind=0.0.0.0:8102" EXPOSE 8102 ENV FLASK_ENV=deployment CMD [ "gunicorn", "main:app" ] </code> -
docker-compose.yml
version: '3' services: web: image: frostbyte.stu build: . env_file: - .env ports: - "8102:8102" volumes: - ./instance:/instance restart: unless-stopped -
nginx_file
    server {
        listen 80;
        listen [::]:80;
        server_name frostbyte.stu.nighthawkcodingsociety.com;
location / { proxy_pass http://localhost:8102; # Preflighted requests if ($request_method = OPTIONS) { add_header "Access-Control-Allow-Credentials" "true" always; add_header "Access-Control-Allow-Origin" "https://nighthawkcoders.github.io" always; add_header "Access-Control-Allow-Methods" "GET, POST, PUT, DELETE, OPTIONS, HEAD" always; add_header "Access-Control-Allow-MaxAge" 600 always; add_header "Access-Control-Allow-Headers" "Authorization, Origin, X-Origin, X-Requested-With, Content-Type, Accept" always; return 204; } } } </code>
How We Will Set UP AWS:
- Login with provided credentials
- Clone our backend repo: (blackstar3092/frostbyte_backend)
- Our .env file will contain our passwords and Gemini API key, and we will initialize our database with ./scripts/db_init.py
- To build the docker environment: docker-compose build & docker-compose up -d
- Finally, we will test our server with curl docker ps # looking for port 8102 curl localhost:8102
Next, we will set up our domain on Route53 (domain will be frostbyte.stu.nighthawkcodingsociety.com) and test DNS through WSL.
Finally, we have already set up Nginx on our backend; we will work on setting it up on the AWS server to function with our backend database, as well as setting up Certbot for authentication.
Notes from Deployment Tech Talk
AWS EC2 Instance:
- In hosted zones: domains are listed (the ones under stu.nighthawkcodingsociety.com is the place to create)
- A-type DNS records: Map record name directly to an IP address
- NS: maps to a name service (DNS Lookup sites) –> Database of names to IPs
- IP address needed: 3.129.120.200
- Nginx configuration file: listener for internet
- We need a .env file (with passwords and our gemini key)
- consider creating another user
- Instance is kept outside of virtual machine so the database doesn’t clear upon every restart of the virtual machine